Modern features for Blood mappers
[Apr 16 2023]
The following features was made by NoOne and it's fully supported by NBlood and Raze source ports. The latest dev builds always available on https://lerppu.net/wannabethesis/nblood/latest/ (for NBlood) or https://devbuilds.drdteam.org/raze (for Raze).
I'm not against to add same features in all other existing ports and maintain it. If authors is interested, they can just mail me to baitd@yandex.ru or search for me in Discord channel dedicated to Blood so we can discuss it. Coders may also visit modern features on GitHub.
Hope this helps to make maps better than ever and generally turn map editing to the next level. Adding even more new features is planning as well. If you have any questions, problems, bug reports or suggestions, you may use contacts above to talk with me. The same you can do if you want to update, for instance, my "perfect" english in this documentation.
IMPORTANT! HOW TO ACTIVATE THE MODERN FEATURES
There is two ways to let the port(s) know that you are aiming for modern level design:
-
Put an magic sprite in the map.
- Put an sprite.
- Press [ALT] + [F6] on it in 2d mode to edit it's properties.
- Set RX ID and TX ID to 60.
- Set Cmd to 100: 36.
-
Enable save map file with new version in the editor.
If you are using XMAPEDIT, you must open XMAPEDIT.INI, which usually can be found in XMAPEDIT directory, search for [General] section and change "SaveAsModernMap" value to 1. If you stick with PMAPEDIT, you must apply a patch that makes the edtor save the map with version 7.1. Note that using it is not recommended since is not supported anymore.
Changelog
-
Apr 16 2023
- Large update for Custom dude (type 254) type. Now it using completely new system and allows to setup way more parameters. Refer to chapter to get the details.
-
Dec 03 2022
- There is no limit of tracking conditions and objects for each one anymore.
- There is no limit of sprites which marked with Proximity, Sight, Screen or Impact trigger flags.
- There is no limit of physics affected sprites anymore.
- A little update for Custom dude (type 254): It's allowed to morph (transform) in randomly selected dude. All you need is to have more than one incarnation using same RX channel.
- New features for Gib and Explode objects (types 416, 417). It allows to spawn gibs on TX ID sprites and setup it's appearance in details. For example, you can change tile, palette or even remove timer!
- New features for Blood and Water drip generators (types 701, 702)
- New features for Sector Lighting Changer type.
- More conditions added for IF and !IF types and you can save up to 3 objects to focus on it later.
- New flags added for Effect Generator type.
-
Aug 18 2022
- Event causer TX Channel has been added!
- Sprites that were attached to outside walls of movable sectors (such as Z-motion, Rotate, Slide) will travel with that sector automatically. To understand how it works, read detailed info here.
- New modern type Velocity changer (Type 506) has been added!
- New features for Sector Lighting Changer type.
- New features for Teleport Target type.
- New command 16 has been added!
- A small update for vanilla Trigger Gen (type 700). If hi-tag is set to 1, it's busyTime treated in ticks. It may be useful to generate events way faster.
-
Mar 25 2022
- New features for SEQ Spawner and Effect Generator types.
- New features for PropertiesChanger type.
-
Aug 03 2021
- Raze port officially supports all the features!
- Added new command for Player Control (Type 500).
- Update for Dude Spawn (Type 18).
- Update for Missile Generator (Type 704).
- New modern type Stealth Region (Type 16) has been added!
- New modern type Slope Changer (Type 504) has been added!
- Added new sector commands Continue motion and Pause motion.
- Added patrol mode for enemies. This includes refreshed dude flags and a new command.
- Update for Damager modern type.
- Impact sprite trigger flag is now working.
- Added new conditions for IF and !IF modern types.
- New features for SEQ Spawner and Effect Generator types.
- Physics for sprites got new attributes (See Propertis Changer type).
- Update for for Damage Sector (Type 618).
-
May 09 2020
- Doc update: added many map examples for most of articles. If you see an .MAP icon - you can download the map file.
- Update for Sector Lighting Changer type.
- SequentialTX and RandomTX can work in event redirection mode.
- New conditional modern type IF was added!
- New conditional modern type !IF was added!
- New command "Link" was added for Player Control type.
- Update for Properties Changer type: underwater status for players and enemies automatically changes with sector's status.
- New features added for Inc-Dec type.
- New features added for Sector wind generator type.
- Small update for Effect Generator type.
- Changed damage resistance table for Custom dude.
-
Jan 14 2020
- Support of BloodGDX port is discontinued.
-
New modern type Player Control was added! It designed to change
many various player properties right in the game. It can do:
- Change movement speed and jump height.
- Set player's look and rotate angles.
- Play QAV animations instead of weapon or in fullscreen.
- Play screen effects (delirium, pain, darkening and so on).
- Copy properties of it's sprite to player sprite, so it's possible to use player RX channels.
- Operate with inventory: give or erase weapons, items, keys and so on.
- Player RX channels was added.
- Update for Properties changer type.
- Update for Effect Gen type.
- Update for Resizer type.
- Update for Damager type.
- Update for Custom Dude Spawn type.
-
There is some cool features has been added for Custom dude
- Dynamic dispersion.
- Dynamic damage resistance.
- Dynamic attack distance.
- Much better behavior when attacking the target.
-
Sep 09 2019
- There was added physics control for PropertiesChanger type!
- New features has been added for Path Marker type.
- 1-way switch type now working for walls.
- Teleport Target type can now be triggered!
- New features has been added for Ecto Skull Gen (aka Missile Gen) type.
- New features has been added for Data changer type.
- New features has been added for Picture changer type.
- New features has been added for Damager type.
- New features has been added for SFX Gen.
- New features has been added for RandomTX type.
- New modern type Inc-Dec has been added.
- New features for SEQ Spawner type.
- New features for Effect Gen type.
- Update and new features for Sector wind generator type.
- New features for SequentialTX type.
-
Custom dude
- Can have different mass: the bigger sprite and clipdist, the greater mass.
- Can use custom clipdist (mass multiplier).
- Can damage target by stomp if heavy enough.
- Recoil chance now counts by taking in account weapon type and mass. The greater mass, the less chance to recoil dude. If is melee, the chance is even less than usual.
- Burning state is now optional.
- Electrocution state is now optional.
- Underwater states is now optional.
- Duck states is now optional.
- Can be Kamikaze.
- Can summon other enemies.
- Updates for random item generators.
- Proximity trigger flag has been updated.
- Touch trigger flag has been updated.
- Sight trigger flag is now working.
- New features for PropertiesChanger type.
- Item Shrink Shroom is now working.
- Item Grow Shroom is now working.
- New features for weapon, ammo and health pickups, also check this one.
- General update for most of modern types. It now supports to send any command to destination object. Command 5: Link = just perform operations and don't change state or trigger destination object, while other commands will trigger object after generator operations was performed.
- A lot of minor changes and fixes.
-
May 05 2019
- I'm happy to announce that NBLOOD port officially support all of the features! I will now add new features to both GDX and NBLOOD and continue their support.
- Changes for SequentialTX type
-
Mar 07 2019
- New type Custom dude has been added.
- New type Custom dude spawn has been added.
- Better performance for Enemy Target Changer.
- New features has been added for SFX Gen.
- New features has been added for DudeSpawn.
- New features for BloodBath Start marker.
- New features for Random item generator.
- Update for pods and tentacles. You don't have to enter hi-tag anymore.
- New features for weapon pickups.
-
Feb 03 2019
- Initial release of this document.
Modern features
Dec 03 2022
-
Gib and Explode objects (Types 416, 417) has been updated. It now allows to spawn gibs on TX ID sprites and setup gib FX appearance in details. You can override picnum, palette and many other properties by setting required flags.
- data1 = set gib FX type 1
- data2 = set gib FX type 2
- data4 = sound ID to play
- busyTime = set custom remove timer (in ticks, 0 is default).
-
hi-tag = gib FX appearance settings:
- flag1: inherit palette
- flag2: inherit shade
- flag4: inherit x and y repeat
- flag8: inherit tile
- flag16: inherit cstat (except invisible)
- flag32: inherit angle
- flag64: inherit from destination sprite (from source otherwise)
- flag128: spawn gibs on TX ID sprite(s)
AVAILABLE GIB TYPES:
Data Name Description 1 Glass shards (triangular) Fall to the ground and disappear 2 Glass shards (long) Fall to the ground and disappear 3 Burning Wood chunks Fall to the ground and disappear 4 Wood chips Fall to the ground and disappear 5 Bones Fall to the ground and disappear 6 Particles (orange) Fall to the ground and disappear 7 Particles (blue) Fall to the ground and disappear 8 Meat chunks Fall to the ground and leave blood stains for a few seconds 9 Bubbles (small) Fall to the ground and disappear 10 Bubbles (medium) Float up to the ceiling and disappear 11 Bubbles (large) Float up to the ceiling and disappear 12 Glass shards (triangular) Fall to the ground and disappear, but more dense 13 Glass shards (long) Fall to the ground and disappear, but more dense 14 Colored glass shards Fall to the ground and disappear 15 Burning wood chips Fall to the ground and disappear 16 Hands, eyes and stuff Fall to the ground and remain there 17 Meat, bones, shards and particles Fall to the ground and leave blood stains for a few seconds 18 White particles (small) Fall to the ground and disappear 19 Meat chunks Fall to the ground and leave blood stains for a few seconds 20 Rock chunks Fall to the ground and disappear 21 Burning paper Fall to the ground and disappear 22 Leaves Fall to the ground and disappear 23 Sparks (vertical) Go up and down and disappear 24 Sparks (horizontal) Go left and right and disappear 25 Sparks and particles Sparks go horizontal and disappear 26 Flames 1 Go horizontal and then up a bit and disappear 27 Flames 2 Fall to the ground and disappear 28 Zombie head stack Gives 3 heads with blood stains for a few seconds, but the heads will remain 29 Mime parts Fall to the ground and remain 30 Hellhound parts Fall to the ground and remain 31 Gargoyle parts Fall to the ground and remain -
Blood and Water drip generatos (Types 701, 702) got update as well. It's allowed to disable annoying drip sound or replace it with your own. It also allowed to set initial falling speed of a drip. If sprite have TX ID, the drips will be spawned on destination sprites.
- data1 = randomize busyTime
-
data2 = sound ID to play
- -1: mute the sound
- 0: play default sound
- N: custom sound ID
- data4 = initial drip falling multiplier
Aug 18 2022
-
Event Causer TX Channel (TX ID 50)
Every action in the game can be treated as an event. For example when you pressing a switch, enter sector, touching walls or even destroying gib objects, the game produces an event, which may send command on given TX ID. Sometimes we may need to send command on object if it does not have an RX ID assigned or it's ID is unknown. For that a special TX ID 50 is created.
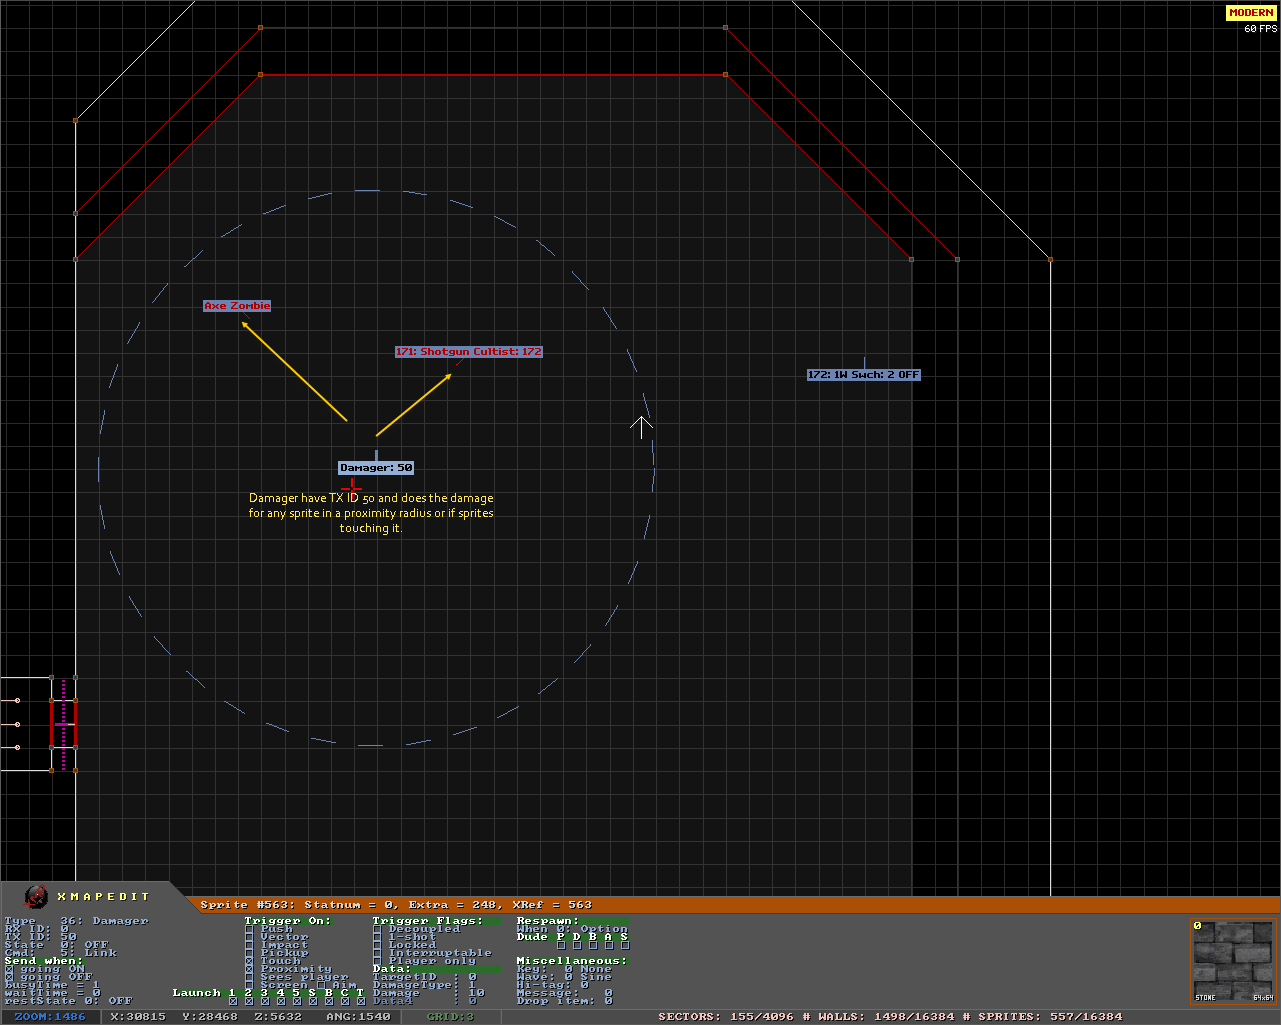
In this example the Damager have TX 50 (event causer channel) which leads to interesting result: it does the damage (sends the command) to any sprite in proximity radius even if the destination sprite RX ID is unknown. This allows to create a complex and very flexible trigger sequences, especially in conjunction with conditional triggers (IF).
There is some limitations, however: objects that using TX 50 must send the command immediately - using waitTime is not safe, because the command may be send to the wrong object.
-
Move outside sprites with movable sector
It's possible to make sprites that were attached to outside walls of movable sector to travel with that sector automatically. This means that there is no need to create a second sector which duplicates properties of the first one anymore.

In this example the sprites placed outside the Z-motion sector, but still close enough to it's walls. Once that sector activates and ceiling moves, the sprites will travel in tact.
For obvious reason this feature intended for all sectors that is supposed to move, but not for marked sector types. For example it works for "Rotate" type, but not for "Rotate Marked", works for "Slide" and "Z-motion", but doesn't for "Slide marked" and "Z-motion SPRITE".
To make this feature work, you need to place sprites close to the walls of sector you want to travel sprites with. Each sector can move up to 256 sprites. The distance between walls and the sprite cannot be longer than 16. Also, to avoid conflicts, sector which contains the sprites cannot be movable and always must be next to the walls of the target sector.
After that you need setup sprites just like you do it for common traveling e.g. blue sprites travels in sector direction and green sprites in opposite. For Z-Motion blue sprites means that it travels with floor and green means that it travels with ceiling.
Aug 03 2021
-
Dude flags and patrolling
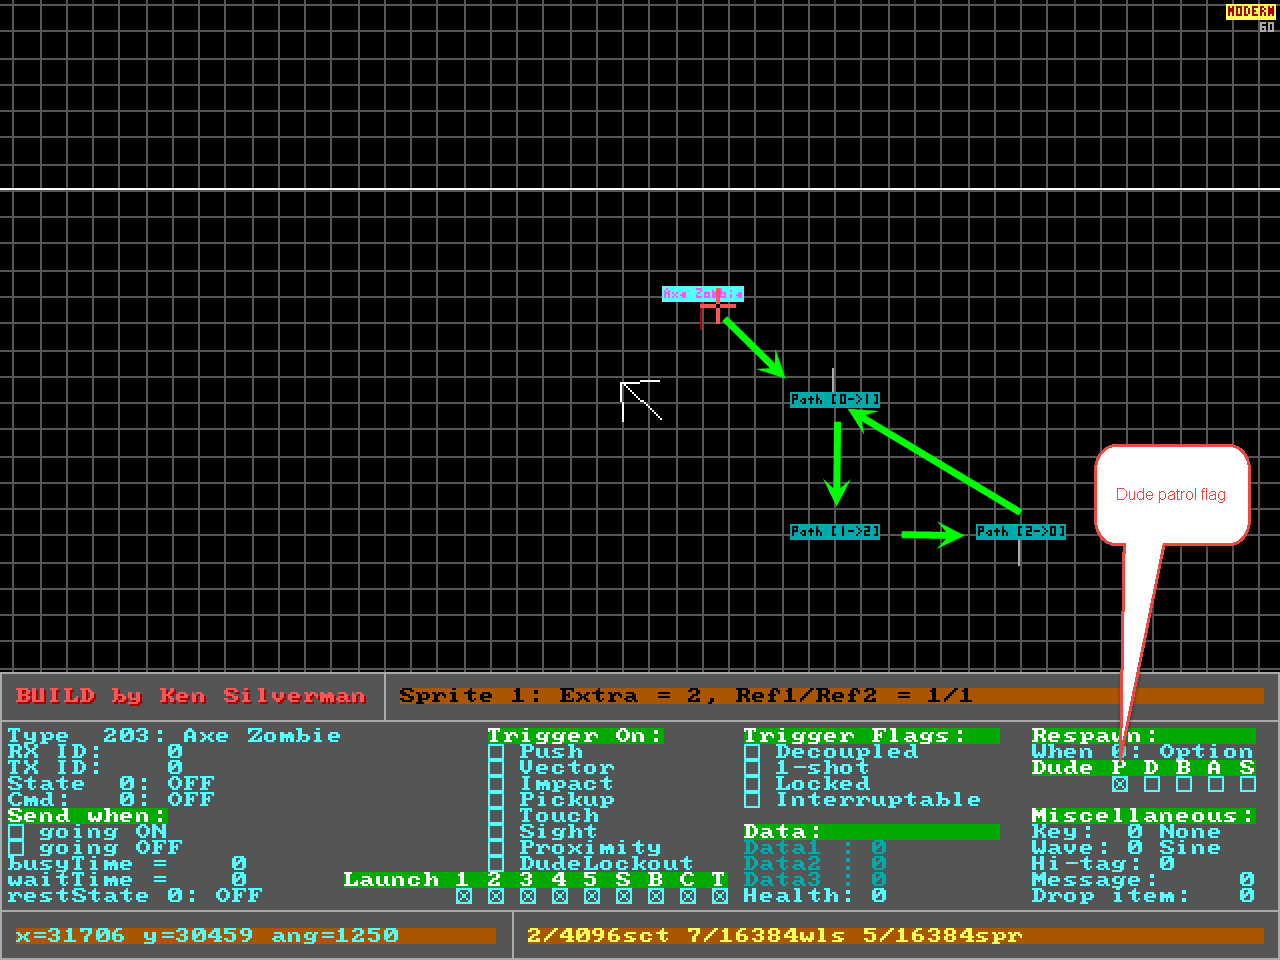
.MAP It's possible to make patrol location by any enemy that can move with using Path Marker (type 15) and dude flags. Basically, this means that AI will follow from one marker to another and go back when is not found. The next marker can be referenced to any of previous markers and can be inserted in underwater sectors, so you can make loops and do many other interesting things which makes your maps more alive.
You must first actually create at least one marker; just put sprite and set type 15. The first marker enemy selects is always the closest marker it can see and it must have no "Locked" or "DudeLockout" flags enabled. There is two ways to make enemy to follow it:
- The first one and the easiest way is to just set dude flag "P" (aka "Reserved" in vanilla MAPEDIT) in the enemy sprite properties. This means that dude will follow markers once level started.
- The second one allows to start (or stop) patrol by sending command "Set Dude Flags" to the destination enemy sprite from any source sprite by RX/TX system. Enemy that receive this command will inherit states of all dude flags.
What if you want the enemy to follow another marker after first one is reached? Just create second marker same way you did it for the first, but set data1 (id of the marker) value, then get back to the first marker and set data2 (id of the next marker) according to data1 of the second one. This is very same way you setup path for sectors. If you create two or more markers with same ID, the AI will select next marker randomly, which could make path a bit unpredictable for the player.
 Linear patrolling
 Marker branches
Path marker that gets reached (see clipdist) by the enemy will be automatically triggered if have TX ID or Command 15 (Set Dude Flags). If it have no TX ID, but still have "Set Dude Flags" command, all dude flags that marker have will be inherited by the enemy that just reached it. This allows you to change dude flags dynamically, but may also lead to unexpected results such as breaking the patrol when is not supposed to be stopped, so you have to be carefully.
Sometimes it may be useful make enemy to stay for some period of time before it goes to the next marker. There is two ways to make it possible: by enterring fixed value in the waitTime field of the marker after which it starts the move again (similar to path sector) or set same values in both data1 (marker id) and data2 (next marker id) which makes the enemy stay until target is spotted. The second way is very useful to build dynamic path using Data Changer or Inc-Dec since you can change data values.
If you want to break the patrol once marker gets reached, you may set value of the data2 (next marker) to -1 or set it to -2 if you want enemy to go back same path.
ADDITIONAL OPTIONS:
- clipDist = defines the radius at which the marker treated as reached for the enemy.
- goingOn = trigger marker when enemy reached it.
- goingOff = trigger marker when enemy leaves it.
- 1-shot = enemy can visit this marker only once.
- busyTime = enemy velocity.
-
hi-tag = flags:
- flag1: enable enemy crouching.
- flag2: disable enemy crouching.
- flag3: toggle enemy crouching.
- flag4: do not turn to the marker's angle at all.
- flag8: do not turn 180deg relative to marker's angle when coming back.
- flag16: enables turning in random direction with random delay while waiting.
Let's back to the dude flags.
The rest of it ((D)eaf, (B)lind, (A)larm, (S)tealth) currently are working only when patrol flag is active and brings additional effects to the enemy:Deaf The enemy is deaf, so the player can be spotted with a sight or touch only. Blind The enemy is blind, so the player can be spotted with a hear or touch only. This flag also known as dudeGuard in vanilla mapedit. Alarm The enemy will activate all other enemies in sight radius once player is spotted. If there is other enemies in patrol and have Alarm flag checked, it will activate enemies that they see too. This flag also known as dudeAmbush in vanilla mapedit. Stealth A special flag that brings some kind of stealth mechanics. This allows the player to sneak around while enemies patrol the location without being spotted immediately. In case if enemy is not Blind nor Deaf, there is spot progress bar will appear on the top of enemy sprite. Player's velocity, race, some sounds, as well as crouching affects spot radius and speed of spot progress. See also IF conditions related to dude flags and Stealth region markers that allows to modify spot chance of the enemy.
-
Enable or disable Damage Sectors
Damage Sector will do the damage only when is enabled (State: 1 On). This allows you to control it via TX/RX system and commands.
Jan 14 2020
-
.MAP Sometimes it may be useful to send command on player's sprite. For instance, you could make Effect Generator to spawn any of effects directly on player's location. This way you could achieve bleeding, if you select "Red blood Trail" effect. For that special Player RX Channels was created.
- TX ID: 30 - Player 1
- TX ID: 31 - Player 2
- TX ID: 32 - Player 3
- TX ID: 33 - Player 4
- TX ID: 34 - Player 5
- TX ID: 35 - Player 6
- TX ID: 36 - Player 7
- TX ID: 37 - Player 8
- TX ID: 38 - All players
Player channels supported by all types, include vanilla ones. So, you probably want to experiment with those a lot to get interesting results.
Sep 09 2019
-
.MAP Teleport target (Type 8) can be triggered via RX ID channel and teleport any TX ID sprite or player from any to it's sprite location! It may be useful to teleport path markers to change path sector's way or player without need to enter the sector. It can also teleport other teleport targets, so it's possible to create complex combinations! There is also few options to control how exactly sprite should be teleported available:
-
data1 = number of player to teleport (if TX ID is not specified)
- 0: [ player that caused the event ]
- 1: player #1
- 2: player #2
- 3: player #3
- 4: player #4
- 5: player #5
- 6: player #6
- 7: player #7
- 8: player #8
-
data2 = set destination object angle according to teleport target angle
- 0: destination object stay with same angle after teleportation
- 1: destination object take angle of teleport target after teleportation
-
data3 = destination object velocity control
- 0: does nothing
- value 1: set velocity to zero (blood-like)
- flag 2: change X and Y velocity according to source sprite angle (quake-like)
- flag 4: set Z velocity to zero
-
data4 = sound id to play
- 0: do not play any sound
-
hi-tag = enable telefrag
- 0: do not enable (default)
- 1: enable
-
-
.MAP There is few cool updates for trigger flags available. Previously, DudeLockout flag has no effect when used in conjunction with Proximity or Touch flags, but now it does. If sprite is not a dude, you can define proximity radius through sprite's clipdist property. Aside from this, "Touch" flag is working for almost every type of sprite and for walls. Sprite or wall with this flag checked gets triggered when player or enemy touching it.
Sight flag was renamed to Sees Player. Sprite with this flag checked gets triggered once it can see one of players from it's location.
Screen flag means that sprite will trigger when it drawn on the screen of one of players. Note that it works only in single player.
Aim triggers sprite when one of players aims in it
If sprite have "Impact" flag enabled, it means that it will be triggered once get hit with projectile, affected by explosion or touch another object (like wall, sprite or sector). Note that not all projectiles can make sprite to trigger.
Just set Interruptable flag if you need object to set command immediately. To get advantage of waitTime property, you will need to setup objects the right way.
First of all, make sure the restState is equals to State of the sprite, however in case of types 400 - 432, there is required to set restState to On. Then pay attention to going on and going off properties:Example 1: [x]going on, [x]going off, waitTime = 0 - will send cmd only once, because waiTime is zero.
Example 2: [x]going on, [x]going off, waitTime = N - will send cmd always, with period specifid in waitTime.
Example 3: [x]going on, []going off, waitTime = N - will send cmd when going to Off state, skip sending when coming from Off, with period specifid in waitTime.
Example 4: []going on, [x]going off, waitTime = N - will skip sending cmd when going to On state, send cmd when coming from Off, with period specifid in waitTime.
To conclude, if you want a Toggle Switch to send command when player fire a flare in it, or Blood Drip Gen spawn drips only when player can see or at close distance, these flags help you save much of your time.
-
.MAP Grow (Type 129) and Shrink (Type 130) shroom items is working! When player is grown, it receives less damage, jumps higher and become heavier, which means it can easily damage by stomp and push back enemies that have less mass than player. Be carefully when pickup this powerup as you may lose your invisibility or can even die if place is too tight to grow ;)
When player is shrink, the enemies can do same thing to player as it becomes very small and receives way more damage than it usually does. However, player can go to really tight place.
-
.MAP You can set custom value for the following types of items using it's data1 field:
- Health (life essence, red potion etc.)
- Weapons (sawed-off, tesla gun etc.)
- Ammo(box of shotgun shells, casoline can etc.)
The value should be greater than 0. If value is greater than max value of the pickup, max value will be used.
Example #1: data1: 1 - will give 1 ammo for sawed-off instead of 8.
Example #2: data1: 0 - will give 8 ammo for sawed-off.
Example #3: data1: 200 - will give 100 ammo for sawed-off.
-
.MAP You can specify number of INI message that will be displayed instead of "Picked Up ..." message when item was actually picked up. Just specify it in Lock msg field.
Mar 07 2019
Feb 03 2019
MODERN OBJECTS
Aug 18 2022
Jun 20 2021
-
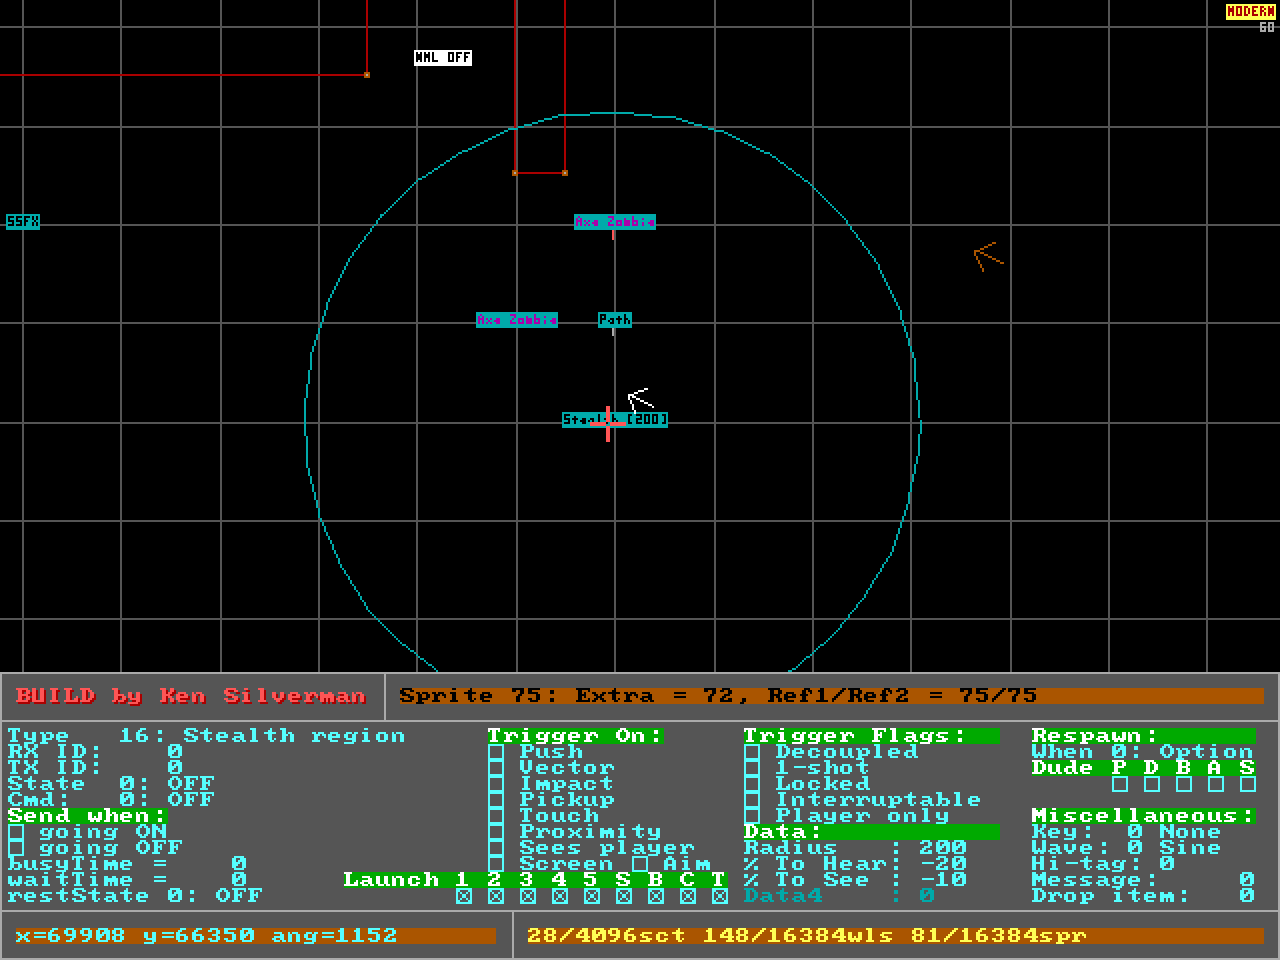
Stealth region (Type 16) intended to change sensitivity of the enemies in patrol mode with Stealth flag enabled. In other words: it allows to modify current chance to spot target via sight or hear when dude or target (default) is in the radius of stealth region.
 Stealth region
data1 = radius at which it treats as active.
Stealth region
data1 = radius at which it treats as active.- 0: active only in stealth region's sector.
data2 = value of hearing chance modifier (does not affect deaf enemies).data3 = value of seeing chance modifier (does not affect blind enemies).The values of data2 and data3 is a percent of hearing and seeing chance relative to current by default. Positive value leads to greater chances, while negative leads to less. Example: data2 = -100 leads to almost deaf enemy and 100 leads to the enemy that hears twice better than with no modifier.
If region have TX ID and spot progress get reached max value while target or enemy in this region, it will be triggered. Note that Locked regions are ignored.
hi-tag = additional options:- flag1: treat data2 and data3 values as fixed percent value.
- flag2: enemy must be in stealth region area instead of target.
- flag4: target and enemy must be in stealth region area.
- flag8: target must have crouch posture.
-
Slope Changer (Type 504) allows to change slope of the destination floor, ceiling or sprite via sending command on TX ID.
data2 = slope value.By default it counts in percents, where 0 means no slope, -100 means -32767 (the max negative value of the slope), and 100 means 32767 (the max positive value of the slope). However, this behavior can be changed if you set flag 1 in hi-tag field (just in case when you need to use fixed values).
There is variety of options available depending on destination object type:
-
FOR SECTORS:
-
data1 = select which slope intended to be changed.
- 0: floor slope only.
- 1: ceiling slope only.
- 2: both.
If destination sector contains floor oriented sprites which Z is really close to floor or ceiling, their slope will be changed automatically according current slope of the floor or ceiling of the sector. You can change this behavior by setting flag 2 in hi-tag field.
-
-
FOR SPRITES:
-
data4 = sprite slope options.
- 0: none: just change the slope to the data2 value.
- 1: set slope according floor slope of the sector.
- 2: set slope according ceiling slope of the sector.
Note that any sprite affected by Slope Changer will become floor oriented automatically. If flag 2 is set in hi-tag field, Z of the sprite will be changed to Z of floor or ceiling of the sector accordingly.
-
-
May 09 2020
-
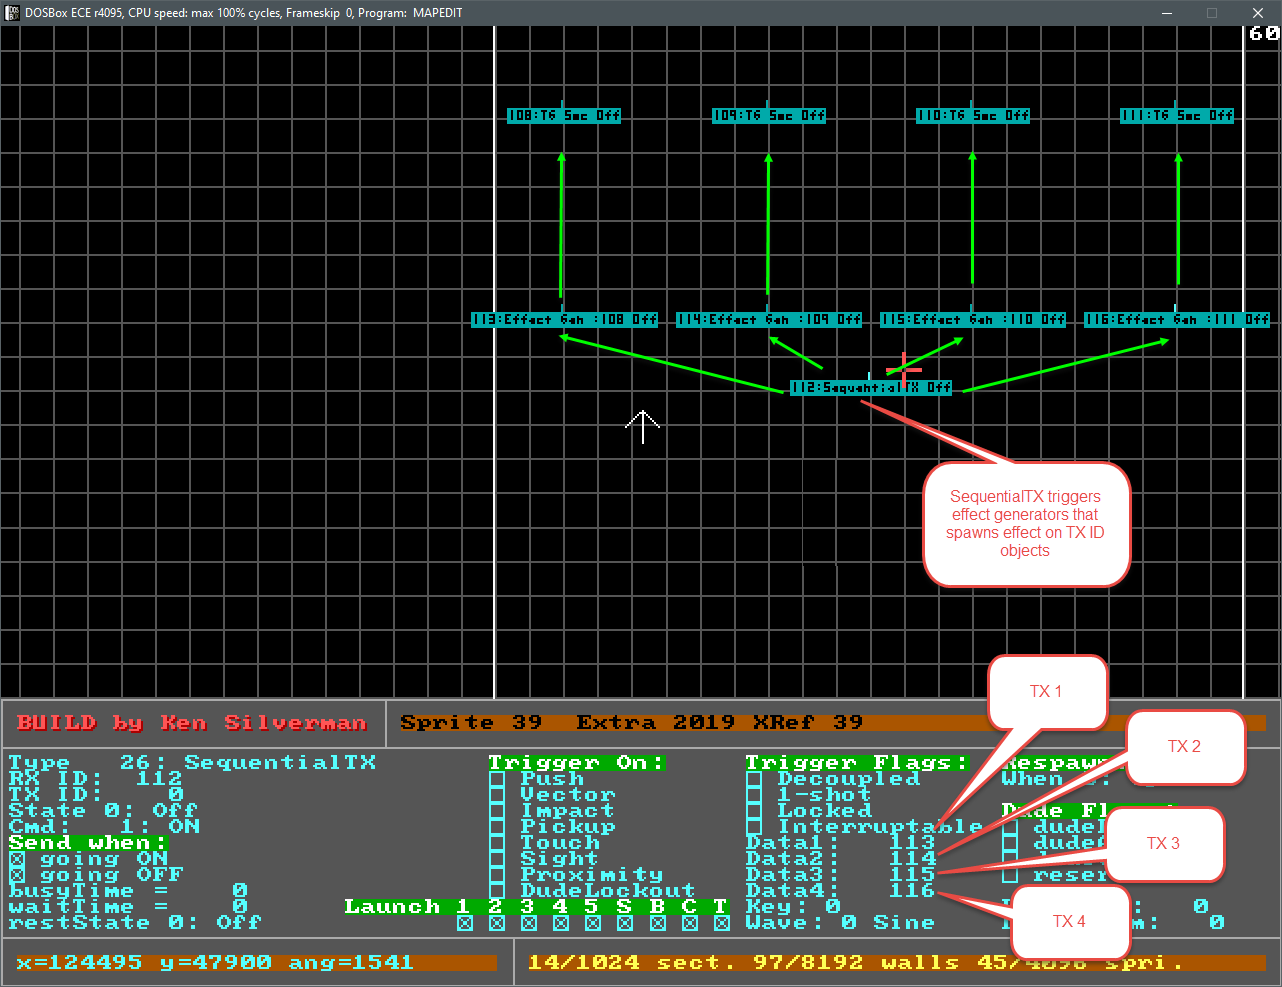
.MAP You already know that each source can send command to destination objects with same TX ID only. Yes, RandomTX and SequentialTX allows to send command on many TX ID objects, but imagine the next situation: we want spawn same effect on different TX IDs using just one Effect generator. By default it's impossible and we have to create the following trigger sequence:
 Spawning effect on different TX IDs objects normally
Looks pretty complicated! Especially if we need to spawn exactly same effect! However, using RandomTX or SequentialTX in event redirection mode allows you to make things like that a lot easier. To make it work in this mode, just set it's command to 5 (Link).
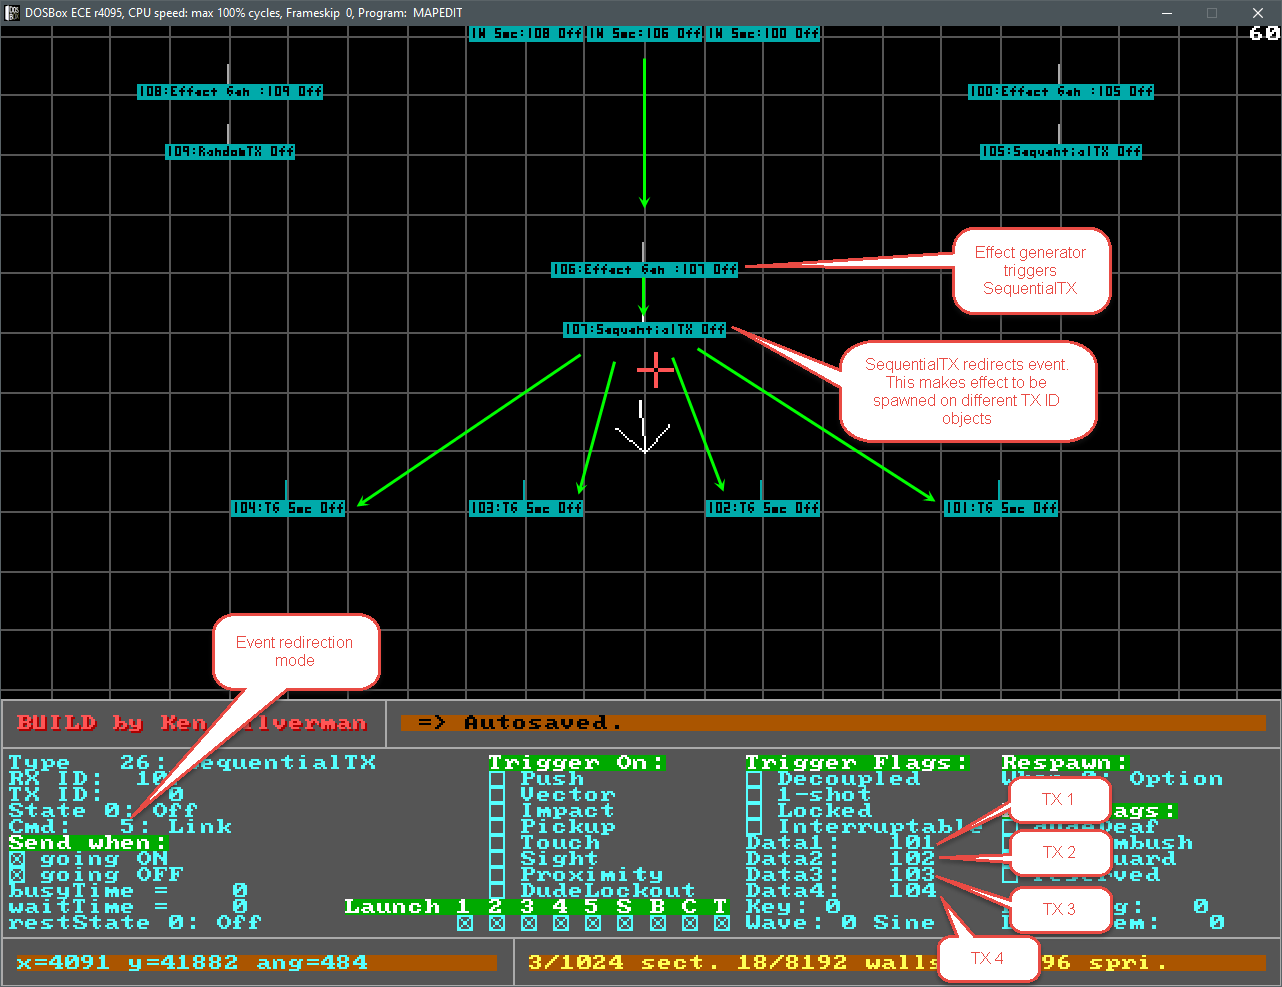 Spawning effect on different TX IDs objects using event redirection
Event redirection mode almost fully inherits normal behavior of these types, so RandomTX redirects to random TX ID, while SequentialTX redirects it to TX ID which selected sequentially. To learn more about normal behavior please click here. Note that redirector sends command of the source object (in this example command of the Effect Generator will be send instead command of SequentialTX).
Each object can have as many redirectors as required - there is no limits for that. Further more - there is nested redirects allowed, so redirectors can redirect events from another redirectors! The following types fully supports event redirection:
704 - Missile Generator 24 - Custom Dude Spawn 18 - Dude Spawn 504 - Slope Changer 8 - Teleport Target 27 - SEQ Spawner 28 - Properties Changer 29 - Picture Changer 31 - Resizer 34 - Sector Lighting Changer 35 - Data Changer 36 - Damager 37 - Inc-Dec 38 - Effect Generator 39 - Sector Wind Generator -
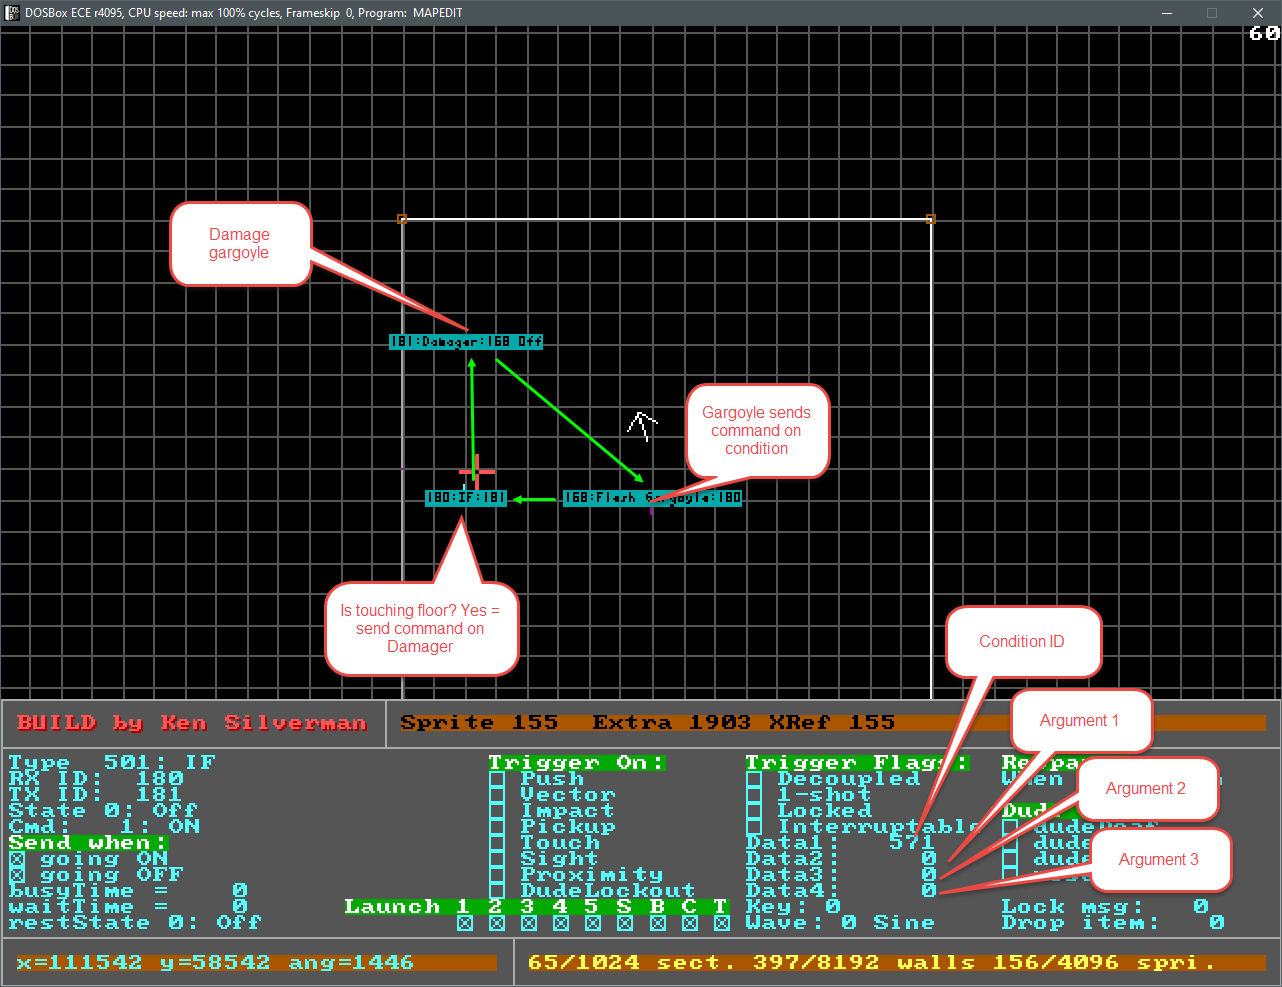
.MAP IF and !IF (Type 501 and 502) is a very special conditional trigger types. In simple terms: it sends command on TX ID (or object that pass check) only when selected condition returns true when type is IF or false in case of !IF.
Imagine script when you need trigger something only if health of player or enemy is in range of specified values, touch walls or another sprites, close to something or visible from specified distance? There is pretty wide range of different conditions which makes it possible and available for you to use.
 Basic condition
All conditions except game ones should have RX and TX IDs. It always must be triggered via command sent from object that must be checked or from another condition. To simplify creation, some traditional parameters such as going on and going off has been ommited and currently is not required. Data1 selects condition ID while data2, data3 and data4 fields intended for condition arguments.
CONDITIONS TYPES
There is two types of conditions available:
-
.MAP Triggerable - a condition that requires to be triggered via command. It works pretty same as triggering the switch. Take a look on picture with basic example. Gargoyle have "Vector" flag checked, so every time it gets hit with hitscan weapon, it sends command on condition with TX ID: 180 that checks if gargoyle currently touching the floor.
You can use as many conditions of such type as you want, however, is not really suitable if we need to damage gargoyle when it touch the floor any time. In this situation tracking condition could help.
-
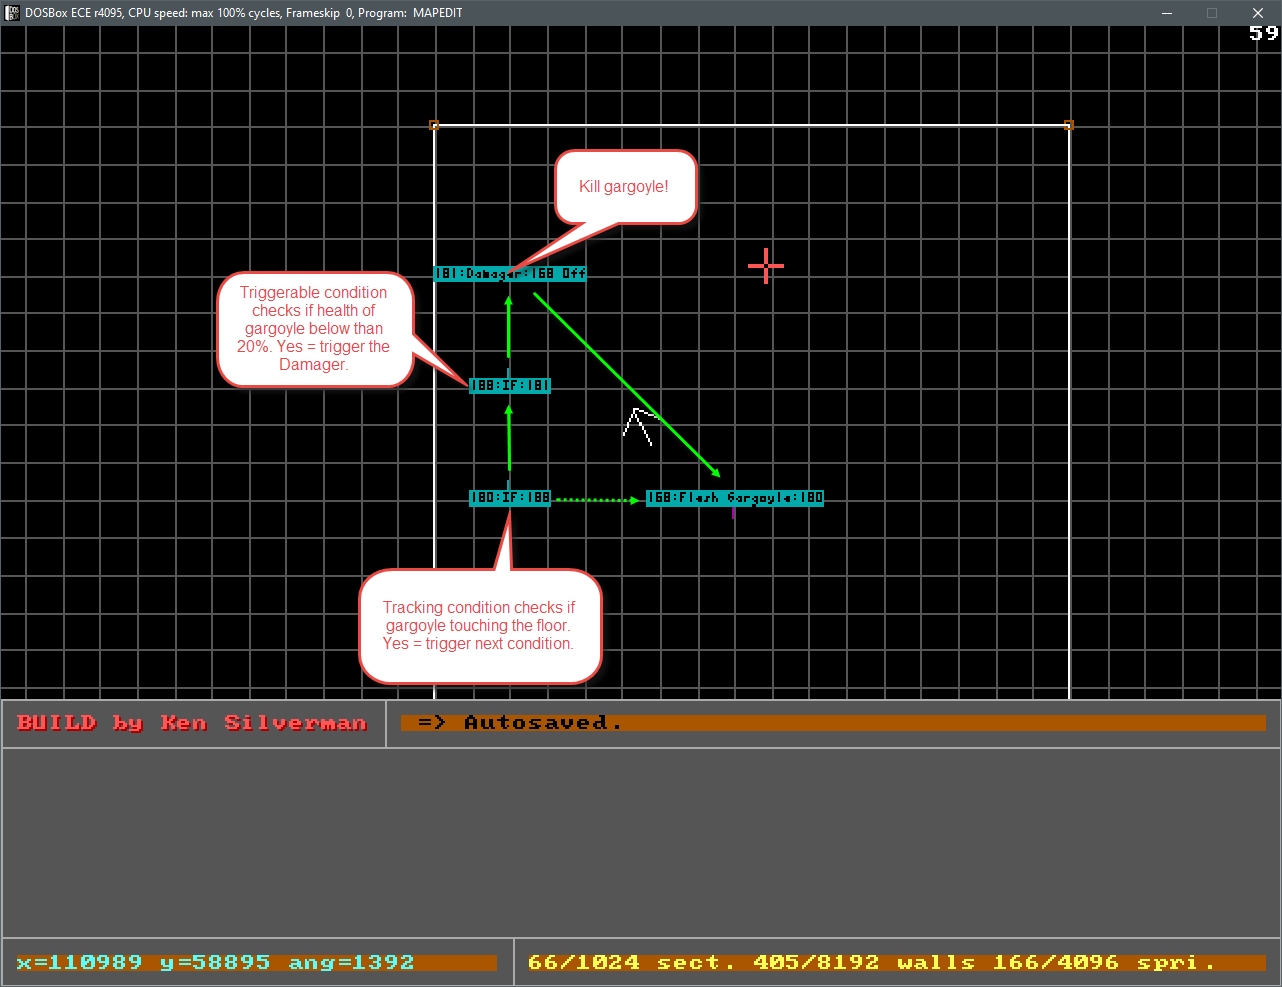
.MAP Tracking condition is an advanced type which checks all assigned objects with every N of ticks specified in busyTime field independently from events. By default it starts working once you start playing the map and ends when level end gets reached.
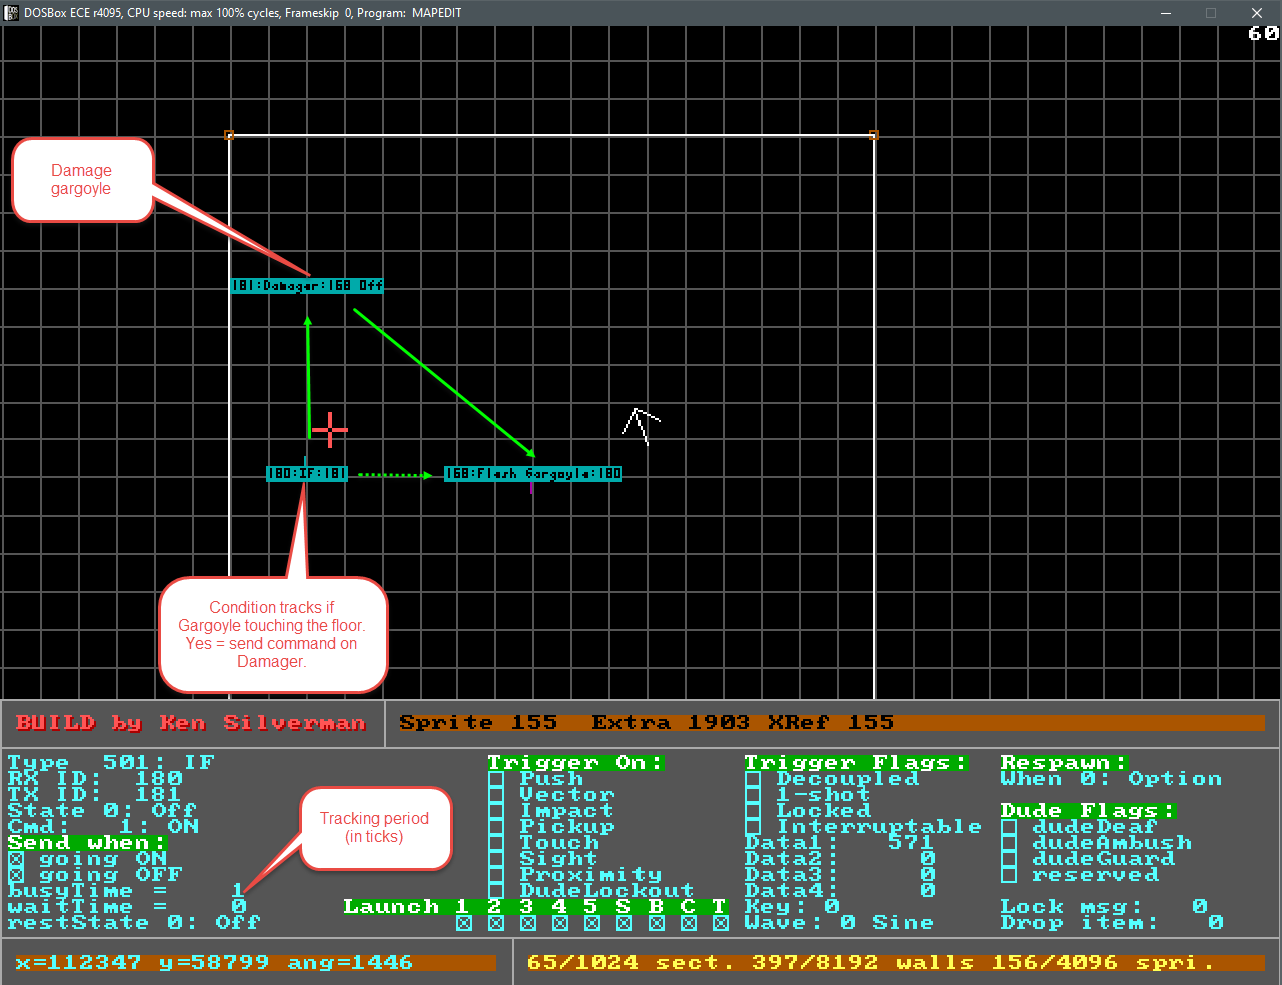 Basic tracking condition
Almost all commands from assigned objects in this mode are ignored, however some global such as Lock, Unlock and Toggle Lock is still working. It can be used to specify when exactly tracking process should operate.
When condition is locked, it does not track objects. If you don't need it start working once game started, just check "Locked" flag and unlock it later via sending "Unlock" command. This automatically launch the object tracking process.
It's pretty easy to assign object to tracking condition. In fact, it performs automatically if TX ID of object point to RX ID of tracking condition. There is no limit for amount of conditions and assigned objects. Also, any object type is fine: walls, sprites, sectors, enemies or even players, however some exceptions is presented: Toggle Switch (Type 20) and 1-Way Switch (Type 21) cannot be assigned and used to control the condition.
SEQUENCE OF CONDITIONS
.MAP The conditions allows you to create complex scripts by creating sequence of conditions, such as: IF sprite in required sector -> AND IF sprite is burning -> AND IF is a player -> [do something]. It's allowed to mix the triggerable and tracking conditions (see examples below). It can be as long as you want, however you should keep in mind that tracking condition must be always first!
 Sequence of conditions
FOCUS CHANGE
.MAP Another thing that is possible with conditions is passing and changing validated objects from one condition to another. By default a condition that is successfuly validated the object, automatically passing it to the next. Sometimes it may require to check objects that was affected by current as well.
For example, we want to know if gargoyle touching the floor of sector and that sector floor is lava, and then we want to kill the gargoyle immediately. The commands 64, 65, 66 allows to override current object by the one that was affected, so next condition in sequence addressed to that one. Setting focus to affected object
FOCUS RESET
.MAP Ouch! Now gargoyle will die always once it lands on any floors that have lava on it! But what if we want it die only if it's HP in a range of specified percents? For sure we need to add HP percentage check, but must also reset focus back to gargoyle sprite since right now we are focusing on a sector. COMMAND 100 allows to reset focus from current object to the initial.
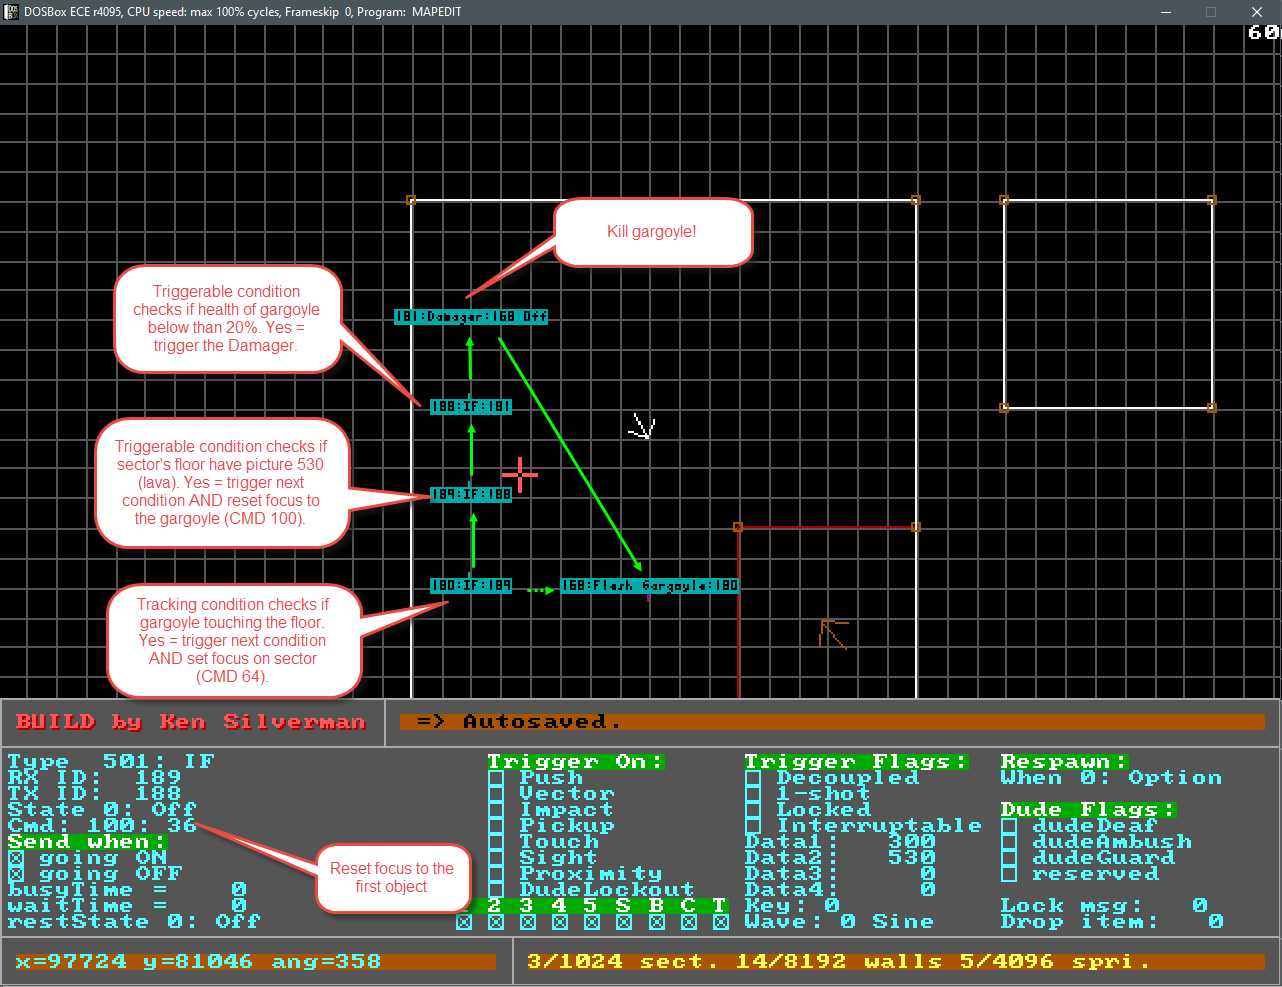 Reset focus to the first object
You also can use commands 101 or 102 to change focus to object that was saved previously with commands 65 or 66 accordingly. If there is no saved objects, the focus will be changed to initial object.
BRANCHES
.MAP Imagine a script: the map have lava sectors, but also have acid ones. Landing on lava sectors currently causes gargoyle to die immediately if it have low health points, but landing on anything else does nothing, however we want damage gargoyle a little once it lands on acid sector. This is where condition branches could help:
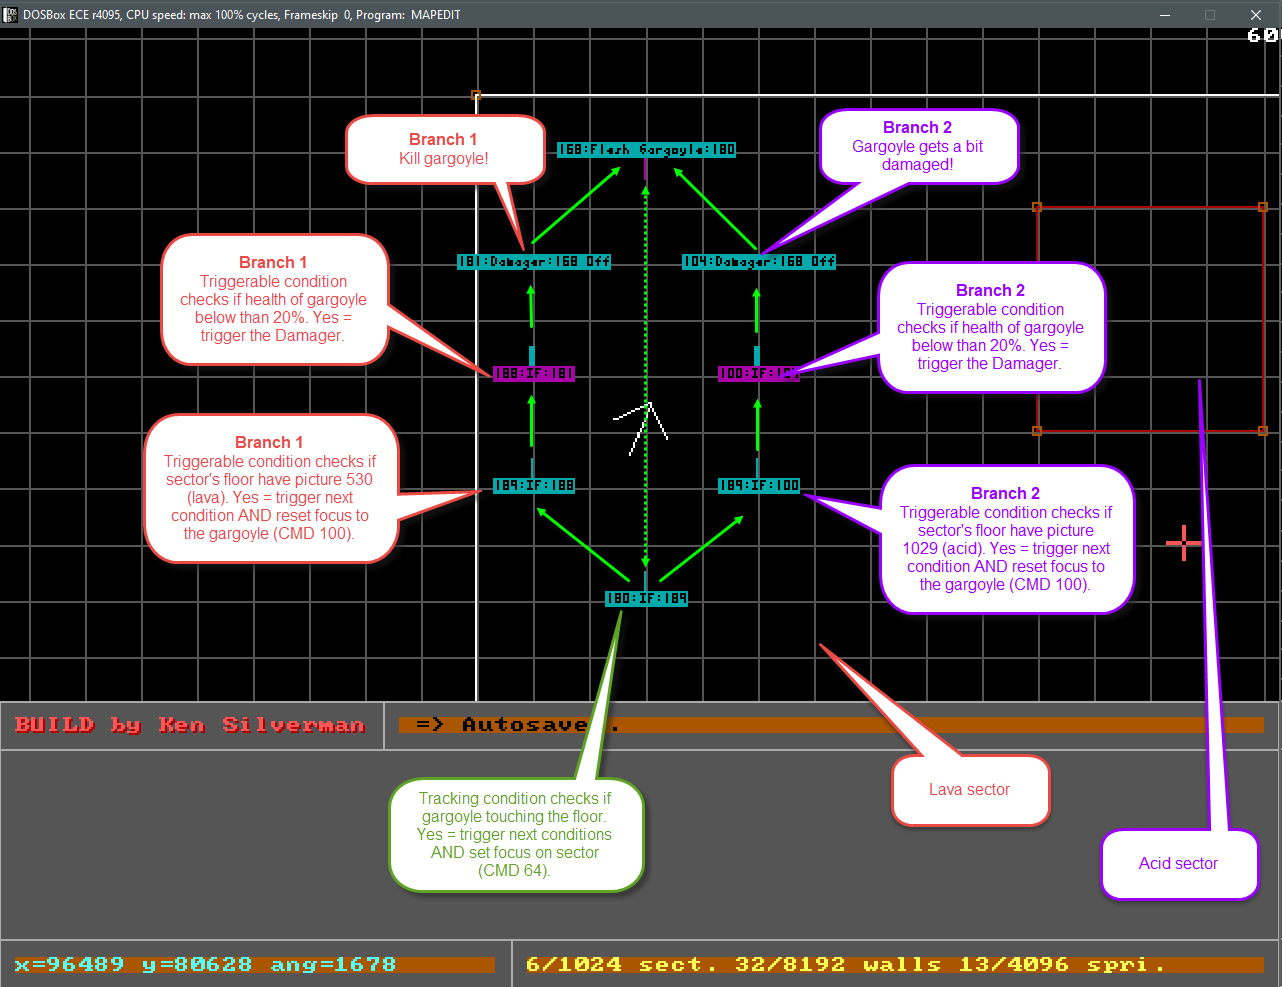 Condition branches
STANDARD ARGUMENTS AND COMPARISON OPERATORS
Many conditions are designed to compare numberic value (i.e. check if health in a range of value1 and value2, check if floor picture equals to value1 and so on). It's just means that you have to specify value1 in data2 and, if required - value2 in data3 field. That's it! When comparsion type is BOOL all operators are ignored.
In addition to arguments, conditions currently supports the following comparison operators that could be selected through changing cstat of it's sprite. Use keys [K] and [B] in 2D Mode to choice.
Operator cstat == data2 normal sprite >= data2 AND <= data3 normal blocking sprite >= data2 blue painted sprite > data2 blue painted and blocking sprite <= data2 green pained sprite < data2 green painted and blocking sprite ADDITIONAL OPTIONS
The hi-tag field allows to specify additional flags
- flag1: send command to object that currently in the focus.
- flag2: send command to initial object.
- flag4: send command once per same state.
1-shot indicates that condition should work only once.
waitTime allows to specify a delay before sending command when condition is successful. If using it with tracking conditions, it's busyTime ticks summing with waitTime.
GAME CONDITIONS
The following conditions does not require to have any objects assigned since it checks global game properties.
Data1 Condition Arguments On focus change Bool 0 This is a dummy condition. It always true and could serve as splitter or switch. 1 Compare level time in minutes [standard] no 2 Compare level time in seconds [standard] no 3 Compare level time in micro seconds [standard] no 5 Compare global kills (current) [standard] no 6 Compare global kills (total) [standard] no 7 Compare secrets found [standard] no 8 Compare total secrets [standard] no 20 Compare global visibility (depth cueing) [standard] no 30 Check chance in percents data4 = percent value, where 100% is 65536 (always true)yes 31 Compare value of random in a range of data2 and data3 [standard] no 47 Compare how many sprites with given statnum is created [standard], data4 = statnum from 0 to 1024no 48 Compare how many sprites created in total [standard] no 57 Is sector exists? data4 = sector numberIf true, changes focus to that sector yes 58 Check if wall exists data4 = wall numberIf true, changes focus to that wall yes 59 Check if sprite exists data4 = sprite numberIf true, changes focus to that sprite yes 60 Check if player connected data4 = player numberIf true, changes focus to that player sprite yes ANY OBJECT CONDITIONS
The following conditions works for any object type that currently in the focus.
Data1 Condition Arguments On focus change Bool 100 Check if object is a sector yes 105 Check if object is a wall yes 110 Check if object is a sprite yes 115 Check if object is an x-object yes 120 Compare object type [standard] no 124 Compare object picnum's surface type [standard], valid types: - 0: none
- 1: stone
- 2: metal
- 3: wood
- 4: flesh
- 5: water
- 6: dirt
- 7: clay
- 8: snow
- 9: ice
- 10: leaves
- 11: cloth
- 12: plant
- 13: goo
- 14: lava
-
for sectors: data4
- 0: floor or ceiling picnum's surface
- 1: floor picnum's surface
- 2: ceiling picnum's surface
no 125 Compare object picnum [standard], -
for sectors: data4
- 0: floor or ceiling picnum
- 1: floor picnum
- 2: ceiling picnum
no 126 Compare object palnum [standard], -
for sectors: data4
- 0: floor or ceiling palnun
- 1: floor palnum
- 2: ceiling palnum
no 127 Compare object shade [standard], -
for sectors: data4
- 0: floor or ceiling shade
- 1: floor shade
- 2: ceiling shade
no 128 Check object cstat -
data2 = required valueSee all cstat values in Properties changer list.
-
for sectors: data4
- 0: floor or ceiling cstat
- 1: floor cstat
- 2: ceiling cstat
yes 129 Check or compare object hi-tag If value of data4 is zero: -
data2 = required valueSee all possible hi-tags in Properties changer list.
- [standard]
-
data4 = bit mask
mixed 130 Compare sprite xrepeat, wall xrepeat or sector floor xpanning [standard] no 131 Compare sprite xoffset, wall xpanning or sector ceiling xpanning [standard] no 132 Compare sprite yrepeat, wall yrepeat or sector floor ypanning [standard] no 133 Compare sprite yoffset, wall ypanning or sector ceiling ypanning [standard] no 141 Compare sprite data1, wall data or sector data [standard] no 142 Compare sprite data2, wall data or sector data [standard] no 143 Compare sprite data3, wall data or sector data [standard] no 144 Compare sprite data4, wall data or sector data [standard] no 150 Compare object RX ID [standard] no 151 Compare object TX ID [standard] no 152 Check if object is Locked yes 153 Check if "going On" is selected yes 154 Check if "going Off" is selected yes 155 Check if object can be triggered only once yes 156 Check if object already triggered yes 157 Check if object disabled (State: 0) yes 158 Compare busy of object in %, where 100% = 65536. [standard] no 159 Check if "dudeLockout" is selected yes 170 Compare ID of SEQ animation spawned on an object [standard] no 171 Compare SEQ animation frame number spawned on an object [standard] no 195 Compare object index [standard] no 196 Compare x-object index [standard] no 198 Check event causer sprite If true, change focus to event causer sprite yes 199 Check if condition received specified command [standard] no SPRITE CONDITIONS
The following conditions works for any sprite that currently in the focus.
Data1 Condition Arguments On focus change Bool 500 Compare angle [standard] no 505 Compare statnum [standard] no 506 Check if sprite is in respawn list yes 507 Compare sprite slope [standard] no 510 Compare clipdist [standard] no 515 Check is sprite have owner sprite If true - changes focus to owner's sprite. yes 520 Check if sprite is in sector If true - changes focus to that sector yes 525 (DEPRECATED) Check if physics affected sprite is in movement data2 = velocity type- 0: any (default)
- 1: x
- 2: y
- 3: z
yes 526 Compare if physics affected sprite is in movement:
Unlike 525, this condition able to compare selected velocity against negative and positive arguments. For example, if z-velocity greater than 0, it means that sprite is falling and if less than 0, then sprite is flying.[STANDARD] data4 = velocity type- 0: any (default)
- 1: x
- 2: y
- 3: z
no 530 Check if sprite is in underwater sector If true - changes focus to that sector yes 531 Check if sprite is immune to damage type data2 = damage type- -1: all
- 0: fall
- 1: burn
- 2: bullet
- 3: explode
- 4: choke
- 5: spirit
- 6: electric
yes - 535
- 536
- 537
- 538
- 539
Check at which object sprite aims now using hitscan -
data2 = clipmask
- 0: block and hitscan
- 1: just block
- 2: just hitscan
-
data4 = max distance
- 0: any (default)
- 535: If scans ceiling of sector - changes focus to the sector
- 536: If scans floor of sector - changes focus to the sector
- 537: If scans wall - changes focus to that wall
- 538: If scans another sprite - changes focus to that sprite
- 539: If scans masked area of the wall - changes focus to that wall
yes 545 Check if this sprite is the target of some enemy If true - changes focus to that enemy yes 550 Compare health in % where 100% = default health [standard] no - 555
- 556
- 557
- 558
Check if sprite currently touching an object -
for 558: data4 allows to specify how exactly sprite should touch an object:
- 0: any way (default)
- 1: with bottom
- 2: with direct hit
- 3: with top
- 555: If touching ceiling of the sector - changes focus to sector
- 556: If touching floor of the sector - changes focus to the sector
- 557: If touching wall - changes focus to that wall
- 558: If touching another sprite - changes focus to that sprite
yes 565 Compare burn timer of sprite in % [standard] If true - changes focus to the burn source sprite no 566 Check if any burning flare stuck in this sprite If true - changes focus to that flare yes 569 Check if this sprite have any sprite targets If true - changes focus to that sprite yes 570 Check sprite mass in KG with getSpriteMassBySize function [standard] no PLAYER CONDITIONS
The following conditions works player sprite that currently in the focus. Players range: 231 - 238. To detect if sprite is a player, you can use comparison by type (120) in mixed conditions. To assign player as object for tracking condition, refer to Player Control examples.
Data1 Condition Arguments On focus change Bool 400 Check if player # is in the game [STANDARD], player range: - 1: player 1
- 2: player 2
- 3: player 3
- 4: player 4
- 5: player 5
- 6: player 6
- 7: player 7
- 8: player 8
If true, changes focus on that player no 401 Compare player team [STANDARD], team range: - 0: no team
- 1: team 1
- 2: team 2
no 402 Check if have an key item -
data2 = specify a key item
- 1: skull
- 2: eye
- 3: fire
- 4: dagger
- 5: spider
- 6: moon
- 7: key 7
yes - 403
- 404
- Check if have an weapon
- Check current weapon
-
data2 = specify weapon
- 0: no weapon
- 1: pitchfork
- 2: flare gun
- 3: sawed-off
- 4: tommy gun
- 5: napalm launcher
- 6: bundle of tnt
- 7: spray can
- 8: tesla cannon
- 9: life leech
- 10: voodoo doll
- 11: remote bomb
- 12: proximity bomb
yes - 405
- 406
- 407
- Compare item amount in %
- Check if item active
- Check if item selected
[STANDARD], valid pack items: - 1: doctor's bag
- 2: diving suit
- 3: crystal ball
- 4: beast vision
- 5: jump bots
405 only 408 Compare N powerup amount in seconds [standard], -
data4 = select powerup
- 1: feather fall
- 2: invisibility
- 3: invulnerability
- 4: jump boots
- 5: raven flight
- 6: guns akimbo
- 7: diving suit
- 8: gas mask
- 9: clone
- 10: crystall ball
- 11: decoy
- 12: doppleganger
- 13: reflective shots
- 14: beast vision
- 15: cloak of shadow (useless)
- 16: rage shroom
- 17: delirium shroom
- 18: grow shroom
- 19: shrink shroom
- 20: death mask (useless)
- 21: wine goblet
- 22: wine bottle
- 23: skull grail
- 24: silver grail
- 25: tome
- 26: black chest
- 27: wooden chest
- 28: asbestos armor
no 409 Check fragger sprite index If true - changes focus to that sprite yes 410 Check keys pressed -
data2 = specify a key
- 1: move forward
- 2: move backward
- 3: strafe left
- 4: strafe right
- 5: jump
- 6: crouch
- 7: normal attack
- 8: alternative attack
- 9: action
yes 411 Is running? 412 Is falling in abyss? yes 413 Compare current race [STANDARD], valid races: - 1: normal human
- 2: beast
- 3: grown human
- 4: shrink human
no 414 Compare current posture [STANDARD], valid postures: - 1: standing
- 2: swimming
- 3: crouching
no 420 Compare armor amount in % [STANDARD], armor types: - 1: fire
- 2: body
- 3: spirit
no 421 Compare ammo count [STANDARD] -
data4 = specify weapon
- 0: no weapon
- 1: pitchfork
- 2: flare gun
- 3: sawed-off
- 4: tommy gun
- 5: napalm launcher
- 6: bundle of tnt
- 7: spray can
- 8: tesla cannon
- 9: life leech
- 10: voodoo doll
- 11: remote bomb
- 12: proximity bomb
no 430 Compare kills count [STANDARD] no 431 Check current auto-aim target If true - changes focus to that sprite yes 432 Check current voodoo doll target If true - changes focus to that sprite yes 445 Compare weapon QAV ID [standard] no 446 Compare scene QAV ID [standard] no 447 Is in god mode? yes 448 Check if player is shrink yes 449 Check if player is grown yes ENEMY CONDITIONS
The following conditions works for enemy sprites that currently in the focus.
Data1 Condition Arguments On focus change Bool 450 Check if have dude sprite targets If true - changes focus to the target sprite yes 451 Check if enemy affected by Enemy Target Changer yes 452 Compare distance to the target in meters [STANDARD] If true - changes focus to the target sprite no 453 Check if target is visible If true - changes focus to the target sprite yes 454 Check if target visible with periphery data2: periphery angle in BUILD units (2048 = 360deg). If value is zero, the default periphery value of the enemy will be used.If true - changes focus to the target sprite yes 455 Check if Patrol dude flag is enabled yes 456 Check if Deaf dude flag is enabled yes 457 Check if Blind dude flag is enabled yes 458 Check if Alarm dude flag is enabled yes 459 Check if Stealth dude flag is enabled yes 460 Check if other patrol dudes follow the marker If true - changes focus to that enemy sprite yes 461 Check if this patrol dude reached the marker If true - changes focus to the marker yes 462 Compare target spot progress in % for dudes with Stealth flag [STANDARD] no 465 Check if dude can interact with objects yes 466 Compare AI state type [STANDARD], valid states: - 0: idle
- 1: generic idle
- 2: moving
- 3: search
- 4: chasing
- 5: recoil
- 6: attack
- 7: patrol wait (land)
- 8: patrol wait (crouch)
- 9: patrol wait (water)
- 10: patrol move (land)
- 11: patrol move (crouch)
- 12: patrol move (water)
no 467 Compare AI state timer [STANDARD] no The following are valid only for Custom Dude sprites
Data1 Condition Arguments On focus change Bool 470 Check if Life Leech is thrown If true - changes focus to the Life Leech sprite yes 471 Check if Life Leech is destroyed If false - changes focus to the Life Leech sprite yes 472 Compare amount of summoned dudes [STANDARD] no 473 Check if custom dude able to... -
data4 = item to check
- 1: can attack
- 2: can turn in burning dude
- 3: can ducking
- 4: can electrocute
- 6: can recoil
- 7: can swim
- 8: can walk
yes SECTOR CONDITIONS
The following conditions works for any sectors that currently in the focus.
Data1 Condition Arguments On focus change Bool 300 Compare visibility [standard] no - 305
- 306
- Compare floor slope
- Compare ceiling slope
[standard] no 310 Are required sprite type is in this sector? [standard] If true - changes focus to that sprite no 350 It's an underwater sector? yes 351 Compare depth level of the sector [standard] no - 355
- 356
Compare height of floor / ceiling in % where 0% = Off state, and 100% = On state [standard] no 357 Check if sector is in movement yes - 358
- 359
Check room over room markers or sectors -
data4 = item to check
- 1: room marker sprite
- 2: sprite owner of room marker sprite
- 3: sector
If true - changes focus to the data4 object yes WALL CONDITIONS
The following conditions works for any walls that currently in the focus.
Data1 Condition Arguments On focus change Bool 200 Compare mask picnum [STANDARD] no 205 Check wall's sector If true - changes focus to the sector yes 210 Check if it's a mirror yes 215 Check next sector it's connected If true - changes focus to the next sector yes 220 Check if have next (other side) wall If true - changes focus to the next wall yes 221 Check if have next wall is connected If true - changes focus to the next wall yes 225 Check sector of 2-nd side of the wall If true - changes focus to the sector of 2-nd side yes -